Coventry Woodworks

custom furniture, interiors & automotive woodwork

A Box for Holly

Our new customer (and now friend) Holly makes the most amazing wedding invitations that are more like miniature pop-up books, than conventional folded cards.  She came to us because she required a box that would house a few of her sample invitations and business cards.  She could then present the sample box to wedding planners so they could show their clients.

A Visit from the Old English Car Club

Last weekend we had a visit from the South Island branch of the Old English Car Club.  An entourage of Jaguars, Minis, MGs, Triumphs, a Rover, a Lotus and even a couple of American -made minivans met in Victoria then toured over the Malahat Drive to reach our shop-studio-garage (motor house) - home and garden in Cobble Hill.

Following the visit, the tour continued to the nearest pub where the group adjourned for well earned refreshment.  After all, touring woodworking facilities is very thirsty work.  Reports followed that a good visit was enjoyed by all and all are certainly welcome back anytime!

Marc's Steering Wheel

A really fun automotive job we did was for a gentleman in his mid-50's who works for Boeing Aircraft in Seattle.  He was in the midst of restoring a 1958 Austin-Healey Sprite, the model commonly known as the "Frogeye". 

He had owned the car since he was eighteen and had many fond memories of driving it around the pacific northwest.  The steering wheel that was on the car, while not the stock one, was the one that had come with the car when Marc bought it so he was keen to see if it could be restored. 

The biggest problem with the wheel was that the metal ring which provides the structural strength had broken and the wooden rim quickly cracked and eventually broke into bits.  The first step in restoration was to drill out the rivets which hold the aluminum spokes so the broken ring could be welded back together.  While that repair was underway a circular form was constructed, then a series of mahogany strips about 1/16" thick were carefully cut to length and added to the form, two at a time.  Once the steel ring had been repaired, the newly polished aluminum spoke section was re-riveted in place.   Eventually, 18 strips had been added around the form to build up the correct thickness of the wheel.

At this point, the assembly was removed from the form and the dried glue cleaned up.  
The wooden ring was then stood up on the table saw so it could be split in half through it's thickness.  The two halves were then routed out with a groove that would accept the steel ring.

Using nearly every small clamp in the shop, the two halves of the wooden rim were re-joined over the metal portion.  The final steps were to file the glue joint smooth then layout and add the finger indentations on the back of the wheel.  A final sanding and 6 coats of exterior urethane and the finished wheel was ready to be reunited with the car.

Nanette's Table

This table arrived at our shop with a really warped top and a request to replace it with a new top of the same diameter. We began by making a new top blank in Baltic Birch plywood, a very nice, flat and stable veneering surface. In order to disguise the plywood edge, the top was cut in the shape of an octagon, then surrounded by 8 pieces of wood so once it was cut into a circle only a solid wood edge would appear.

As the edge was made of 8 pieces, I decided to make the top from 16 pie segments so every second one would align with the edge joints. Sixteen pieces mean each angle is 22.5 degrees, so I cut a template of cardboard to mark each piece of veneer from the flitch. 

One of the great things about working with veneer is that pieces which were sliced sequentially are nearly identical as they did actually touch in the living tree. Choosing which portion of the veneer to use is the fun part using the template and a pair of mirrors which gives a very accurate preview of the final pie-segment pattern.

Once the area of veneer is chosen it's just a matter of using the template to align recognizable features in the grain with the corners of the template. Each one is then marked with a sharp pencil then a straight- edge and veneer saw are used to accurately cut the 16 (hopefully) identical triangles.

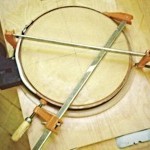
The joining process begins by planeing the edges to obtain a good glue joint, then taping them together in pairs.  Piece #1 is joined to #2, piece #3 to #4, and so on. Once each joint is fully taped the pattern is bent backwards on itself and a tiny dab of glue is used to the joint line. Once the glue is cured all of the tape comes off and the two pieces are permanently connected and every bit as strong as a single piece of veneer.

With 8 pairs joined together, the pieces are planed again and joined to form the quarters.   With the quarters complete they are checked to confirm a 90 degree angle.  ( I now know why hockey teams so often say: "Things were going great until we hit the quarter-finals.")  A few minor adjustments and the quarters were joined into the two halves, which were then adjusted and the final circle was taped and glued.

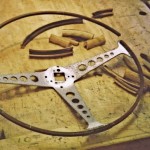
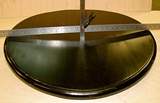
The trick used to make sure the veneer segments were centered on the plywood substrate was to place a tiny finishing nail in the centre of the plywood circle which was just allowed to poke through the point where all of the veneer segments met.

Once the veneers were pressed onto the circle and trimmed, a few coats of urethane were applied and the table was ready to head home.